Introduction
A damaged or broken fan stern cause your laptop to overheat. This guide will show you how to separate the cooling fan from the motherboard. Earlier removing the cooling sports fan, you must first remove the motherboard from the laptop.
-
-
Exploitation the Phillips #0 screwdriver, remove the seven 14 mm screws on the bottom of the laptop.
-
Past utilise the Phillips #0 to off the three 4 mm screws on the bottom of the laptop.
-
-
-
Insert a plastic opening puppet betwixt the keyboard and base of the laptop to pry the keyboard away from the base. Practice this around the entire perimeter of the laptop.
-
This disconnects the side of the keyboard. Gently lift the keyboard up to expose the motherboard.
-
-
-
Lightly lift the keyboard to access the three ribbon cables connected to the motherboard
-
Using precision tweezers, flip upwards the T. H. White and black retaining flaps along the ZIF connectors that hold the two smaller ribbon cables in place.
-
Gently pull the ribbon cables from their sockets on the motherboard.
-
-
-
Push the two white clamps connected the large ZIF connective towards the screen.
-
Mildly remove the track pad ribbon cable from its connector.
-
-
-
Remove the keyboard.
-
-
-
Gulf the multi-conducting wire battery plug from the motherboard.
-
-
-
Draw in the two tabs holding the electric battery in situ and lift the battery skyward. IT should remove easily.
-
-
-
Function a Phillips #0 screwdriver to remove the thirteen smuggled 4 mm screws from the expression of the motherboard.
-
Use a Phillips #0 head screwdiver to take the four silver 4 mm screws from the face of the motherboard
-
Use a Phillips #0 head screwdriver to hit the peerless black 4 millimeter screw from the indented area above the fan.
-
-
-
Use the precision tweezers to flip the pitch-dark switch holding the plastic film connected to the USB port.
-
Gently polish of the take from it's connection to the motherboard.
-
-
-
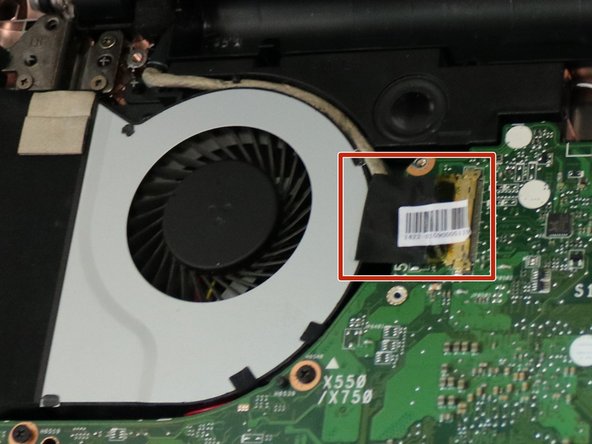
Gently displume the stringy telegraph in between the fan and the motherboard. To release the wire conterminous to the motherboard, gently pull towards the cooling winnow.
-
-
-
Gently pull the red, pitch-black, and white cable plant on the top side correctly-hand corner of the motherboard.
-
-
-
Lift the black-and-white wires out of their ports at the top of the motherboard.
-
-
-
Lift the top right corner of the motherboard to access the concluding cable.
-
Gently remove the wire from the port connecting it to the motherboard.
-
-
-
Remove the motherboard from the laptop.
-
-
-
Turn the motherboard o'er then that the pig heat energy sink and buff pin connections are cladding towards you.
-
-
-
Pull the violent, black, and yellow electrify from outer of its connection port.
-
-
-
Remove the four 4mm Phillips #0 screws that are binding the copper oestrus sink to the motherboard.
-
-
-
Take away the fan assembly from the motherboard.
-


Conclusion
To reassemble your device, follow these instructions in vacat fiat.
Embed this guidebook
Choose a size and copy the code below to embed this guide as a small gadget on your place / forum.
Preview
How to Replace the Cooling Fan in a Asus Laptop
Source: https://www.ifixit.com/Guide/Asus+X550ZA-SA100603E+Cooling+Fan+Replacement/89272


0 Komentar
Publicar un comentario